
Facebook is the world’s largest and substantial social media platform, connecting a pool of more than 1 billion users around the globe with each other. If you want to know How to Deactivate The Facebook Account keep on reading the article.
Before starting with steps to deactivate the Facebook account. Let’s see the benefits you can avail yourself of by using this platform. It is the most preferred platform which provides every feature to keep users engage on the page. With its amazing updates, it has become a favorite of individuals as well as professionals. Earlier this platform is used for messaging, chatting but now with digitalization importance of Facebook is leveled up to the great extent. You can use Facebook to run your ads, promotion of your brand, and many more.
Keep your options open and Know about How To delete your Facebook account? here.
If you are still on your decision to deactivate your Facebook account. Let’s proceed with the steps you need to follow for the same.
Steps To Deactivate The Facebook Account
You can deactivate the Facebook account temporarily and come back anytime you want.
To Deactivate the Facebook account
Step -1
Sign In to your Facebook account by using your User Id and password.
Step-2
On the top right of your profile picture, click on the Down Arrow Icon sign to see details of your profile.
Step-3
By clicking on the down arrow, a drop-down list will appear. From there select “Settings and Privacy”.
Step-4
A new dialog box will appear with various options to select “Settings”.
Step-5
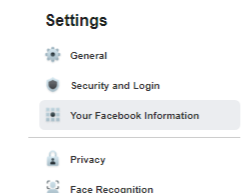
On the left side of the navigation panel click on “Your Facebook Information”.
Step-6
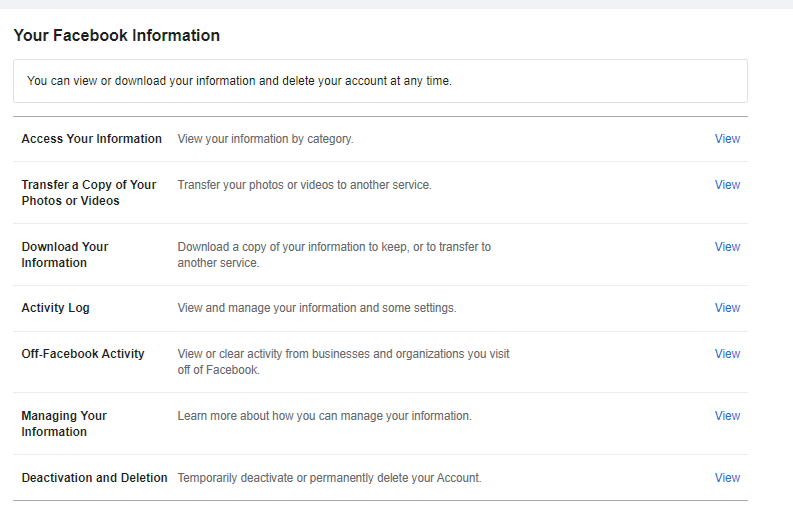
On this page, at the bottom, you need to select the option “Deactivation And Deletion” click on the view tab just next to the option.
Step-7
Now you will be redirected to the next page. From the two options
- Deactivate Account
- Delete account
Select the “Deactivate Account”.
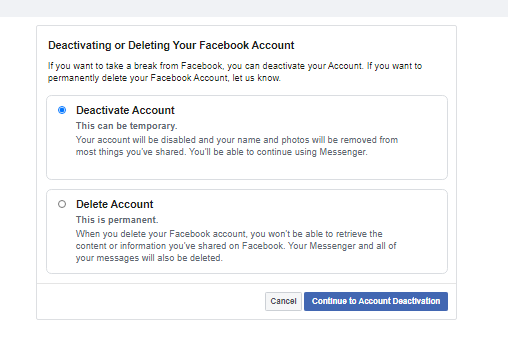
Next click on the “Continue To Account Deactivation”.
Step-8
After the above step, you need to put the reason due to which leaving Facebook. A list of options will be available.
Note: you can select one of these,
- Email opt-out: if don’t want to receive notifications or emails.
- Messenger: if you want to keep using Messenger
Step-9
Now select deactivate, a dialogue box will appear to confirm it again.
Click on “deactivate now”. Deactivation for your Facebook account will be complete with this.
Important points when you decide to deactivate your Facebook account:
If you Deactivate your Facebook account your profile will get disable, but some information can still be accessible to others.
- You can still chat with friends on Messenger.
- Your Facebook user profile can be seen in your conversations on Messenger.
- People can still search for you and can send you messages.
- Group admins might be able to see the posts, comments of yours, including the name.
- You will disable to use your Facebook account to have access to Oculus products or your Oculus information.
Deactivation of the Facebook account comes with the flexibility which enables you to Reactivate your account. For this, you just simply need to put your id and password and click on sign in.
Difference between deactivating and deleting a Facebook account
There is a huge difference between deactivating your Facebook account or deleting it. This a very crucial decision which should be taken after a deep thought. Let’s see what is the difference between deactivating the Facebook account or deleting it.
- When you opt for deactivating your account you can again activate it anytime.
- In case you decide to delete your Facebook account, it is non-reversible. Once you delete the account it cannot retrieve it again.
- Deactivating the account, you don’t get the option to save your data and information on Facebook.
- But while you go for deleting the account you can download all your data very easily.
- Deactivation is done instantly when you request for same.
- Deletion of Facebook account is processed after a few days, as you can’t change your decision then. But if within that few days you change your mind and sign in back to Facebook request gets null and avoids automatically.
- Once you deactivate the account, you will lose access to your Oculus account. But when you take the action of deletion of your account and the same account is used for signing in to the oculus, your oculus account information also deletes.
- With deleting the Facebook account, you will not be able to access the apps linked with your account anymore.
Note: you must have an email id or number which to proceed with reactivation.

